Becker 868 Operation Instructions
In Australia, the 560 models were standard with a Becker 868 or later 874 Mexico CD Player. This doesn’t sound like much of a deal in 2022, but back in the mid 80s this was a huge deal. Should you have wanted to upgrade your 300SE or 420SEL from the standard Becker Cassette player to the CD, you would have paid more than $2,000 extra in 1990. This is almost $4,500 in todays money.
In most countries, the CD Player was an optional extra even on the 560 models, but Mercedes-Benz Australia priced them so high they needed justification for the difference between the 420 and the 560. This was harder than in other markets as Australian 420SELs come with a very high level of standard equipment.
My 1987 560SEL is still equipped with a working Becker 868. At least I know the radio works well. I threw away all my old CDs about a year before I purchased the car. I had never really examined the manual before, but wanted to compare with the Becker 1402 I was looking at earlier in the week. I’ve never really needed to examine the manual as the radio function is actually simpler than the cassette player.
I’ve never been able to find much information about the Becker 868. It seems to be a derivative of the Becker 860, which is sometimes for sale in Europe. In later years (around 1990 or so), the 868 was replaced by the 874. It looks very similar, but has an unlabelled button to the right of the ON button. It also seems in other markets the 876 was the most common player. I can only assume there were minor regional differences like the cassette players.
Becker 868 Buttons
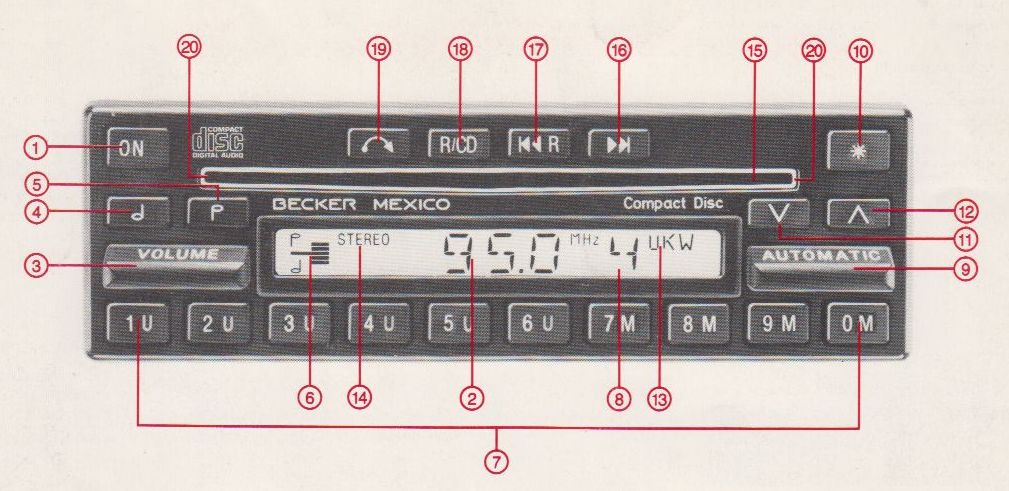 ON/Off
- Digital Display
- Volume Control
- Tone Control, bass
- Tone Control, treble
- Indication for tone control
- Wave band – and station recall button
- Indication for pressed station recall button
- Automatic bar
- Function control button
- Manual tuning (decreasing station frequency)
- Manual tuning (increasing station frequency)
- Wave band indicator
- Stereo indicator
- CD-slot
- Selection key (forward)
- Selection key (backward)
- R/CD-key
- Eject button
- Light diodes
Becker 868 radio functions
On/Off
To switch on the radio, push button (1). The radio will ‘remember’ the last station tuned and the last volume and tone setting before the radio was turned off. The station frequency is displayed (2). By turning the ignition key from position 1 or 2 to position 0, the radio is turned off. By pressing the key (1), the radio is turned on again. To switch off, push button (1) again.
Volume
Pressing button (3) downwards will decrease the volume, pressing button (3) upwards will increase the volume.
Tone
By pressing the button (4) the bass is boosted or reduced, by pressing the button (5) the treble is boosted or reduced. Pressing buttons (4) and (5) at the same time gives an intermediate setting. The indicator (6) show, how bass and treble are set.
Wave band selection
Select desired wave band by pressing one of the wave band buttons (7). The indicator (13) shows the set wave band.
Wave band
U = ultra-short wave (FM) – 87.5 MHz – 108 MHz
M = medium wave (AM) – 510 kHz – 1620 kHz
Station tuning
Stations can be selected either by automatic search, numerical frequency input, manual tuning or the preset buttons. For good FM-reception we recommend to tune in the most powerful, local station. Enclosed you find a cassette explaining physically caused radio interference, their causes and possible helps.
Automatic search
Press automatic-bar (9) downwards (= decreasing station frequency), or upwards (= increasing station frequency). The radio has a three-stage sensitivity switch. It searches for the powerful stations during the first sweep, for the less powerful during the second sweep and for the weak ones during the third. When starting the automatic search you can select the desired sensitivity state directly by pressing the automatic-bar (9) twice (= less powerful stations) or three times (= weak stations). If the automatic-bar is pressed again within approx. 8 seconds after a station has been tuned in, the station search will continue along the same sweep as before.
Numerical frequency input
You can select stations in all wave bands by entering the station frequency. Frequencies beyond the frequency ranges are not accepted. In the FM-band the input of the station frequency is limited to one digit after the decimal point. The first digit after the decimal point must be keyed in! Example FM-station 95.0 MHz: Select FM-band by pressing one of the U-buttons (7), press function control button (10). The display (2) disappears, the station is mute. Press buttons (7) in the sequence 9, 5, 0. The station frequency will then be displayed and the station be heard.
Manual tuning
Press the button (12) (increasing station frequency) or press the button (11) (decreasing station frequency).
Station recall buttons
All wave band buttons (7) are at the same time station recall buttons. You can store 6 FM-, and 4 AM-stations. Example: The FM-station 95.5 MHz should be stored at one of the U-buttons: Set wave band by pressing one of the U-buttons (7). Select FM-station 95.5 Mhz by numerical frequency input, automatic search or manual tuning. Press the desired U-button (7) and hold down until the frequency of the station to be stored re-appears in the display.
Now the last set station becomes audible and its frequency is displayed. Then the radio is mute and the display disappears. After that the new set station becomes audible and its frequency is displayed. Now the station is stored at this button and becomes audible whenever the same button is pressed and as long as the car is in the the transmitter range of the station. When storing another station at the same button, the station stored before is cleared. When recalling a stored station, the indicator (8) shows the number of the pressed station recall button.
Stereo reception
The indicator STEREO shows that a chosen FM -station is transmitting stereo signals. Good quality stereo reception, however is possible only in areas of high field intensity. Your radio is fitted with a continuously operating stereo decoder which automatically switches the radio from stereo to mono reception, if the signal becomes weaker. The stereo indicator remains lit. If the signals of the tuned in station become too weak, the stereo indicator lamp (14) goes out.
Becker 868 Compact disc reproduction
Notes on compact discs
- Hand the disc by its edge, and keep the disc clean, do not touch the rainbow coloured surface.
- Do not stick paper or tape on the labeled surface
- Do not expose the disc to direct sunlight or heat sources such as hot air ducts, or leave the car parked in direct sunlight where there can be a considerable rise in the temperature.
- Before player, clean the disc with an optional cleaning cloth, radially from the inside to the outside.
- Do not use solvents such as benzine, thinner, commercially available cleaners or anti-static spray intended for analog discs.
- After player, store the disc in its case.
Disc play
Before inserting a compact disc, switch on the unit by pushing the ON/OFF key (1). Insert the disc into the disc slot (15) with the label surface facing up. The disc is automatically loaded into the unit and play starts at the beginning of the first selection. The indication shows the operating mode CD, track number, and the tone control setting.
When the last selection has been played, the unit switches automatically to radio reception. As long as a compact disc is in the slot the two light diodes (2) at the right and left side of the CD-slot illuminate.
R/CD-key
With the R/CD-key (18) you can switch to radio reception during CD-reproduction. By pressing the R/CD-key again, play starts from the last reached point.
Selection keys for-/backward
By pushing the selection key (17) once, you can repeat the selection being played. By pushing the key (17) several times, you can repeat several selections or the whole disc. By pushing the selection key (16), the momentarily played selection is faded out, the reproduction starts at the beginning of the next selection. By pushing the key (16) several times, you can skip ahead until the beginning of the last selection. The indicator shows the selection that is played at the moment.
Eject button
Shortly press the eject button (19) to remove the disc and to switch to radio reception. If the disc is ejected and left for more than 15 seconds, the disc is automatically inserted into the unit again to avoid damage and dirt.
Precautions
- If the disc is automatically ejected, remove the disc and load it again.
- If you car was parked in direct sunlight and there has been a considerable rise in temperature inside the car, allow the unit to cool off before operating. If the temperature exceeds 60C or more, the protection functions and the player cannot be operated.
- On a rainy day or in a very damp area, moisture may condense on the lenses inside the unit. Should this occur, the CD-player will not operate. In this case, remove the disc and wait until the moisture evaporates.
Becker 868 physical connections
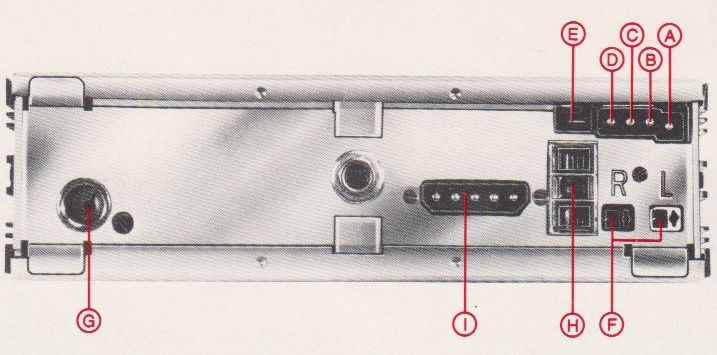

- Chassis (-)
- Switched (+)
- Illumination
- Permanent (+)
- Connection socket for automatic antenna (+12V)
- Loudspeaker sockets
- Antenna socket
- Fuse 5 AT
- Connection socket for speed dependent volume control
- –
- Connection receiver – CD-player
- AF connection
- Direct voltage converter
Attention!
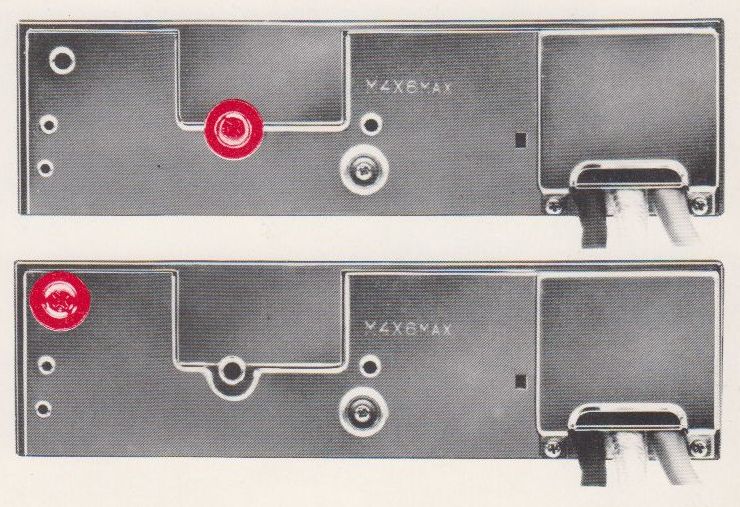
Before installation remove the red transport screw at the back and keep it in the marked out thread for later transports (see fig.). To guarantee sure operation the unit should not be installed more than 20 degrees titled.
Upper diagram: Radio secured with transport screw.
Lower diagram: Screw in thread for later transport.






3 Responses
[…] suspect this is because the Becker 868 is a two piece unit, and the antenna trigger wire comes from the secondary box, which is located in the boot on my […]
[…] lot, I was able to finally able to answer a question I had for years. Did the original Becker 868 CD Player from 1987 work in my 560SEL? I had thrown away all my CDs a few years before I bought the […]
[…] I also discovered after 2.5 years of owning the 560SEL, the AM function does not work on the Becker 868. I was going to tune into the AFL grand final. In the end I found an FM station broadcasting […]