| Today was the first day of our epic road trip to Melbourne in 9 classic Mercedes Benz. Our goal was to head down for the annual MBCV concours event and a tech day they were running the day before. I previously covered the plan for the trip. Our destination today was Tumut. Before we even started, we lost one of the cars. One of our group had purchased a lovely ‘new’ W108 280SE 3.5 earlier this year. It’s a really nice car, but it had not seen a whole lot of use in recent years. Unfortunately all the work required to get the car ready for a trip like this was not complete. Its the usual thing with classic cars. The more they are used, the more reliable they are. Our route started in Mt Victoria (Sydney’s Blue Mountains) at 6:30AM. Therefore, five of us elected to stay up there the night before on an unofficial ‘day 0’. I was one of them. This meant for a much easier start. Two more of our group lived somewhat locally and elected to meet us at the starting point ,and two more skipped the first leg and planned to meet us at Goulburn. The seven cars doing the first leg met without major incident in Mt Victoria. The only minor issue was that one of the W108’s had a snapped a handbrake cable that morning. For our first leg, we had seven cars – three W108s (Two 280SE 3.5s and a 280S, two C126s (my 560SEC and a 380SEC), a 450SLC and a 320CE. 
Our first leg would take us from Mt Victoria to Goulburn where we had planned to meet the other two people at the Big Merino. The road from Mt Victoria to Goulburn is one of my favourites in NSW and it didn’t disappoint today. There was very little traffic at all, and the road is a delightful combination of twisty sections, long sweeping corners, elevation changes and amazing scenery. It is one of those roads you can have fun driving at the speed limit. 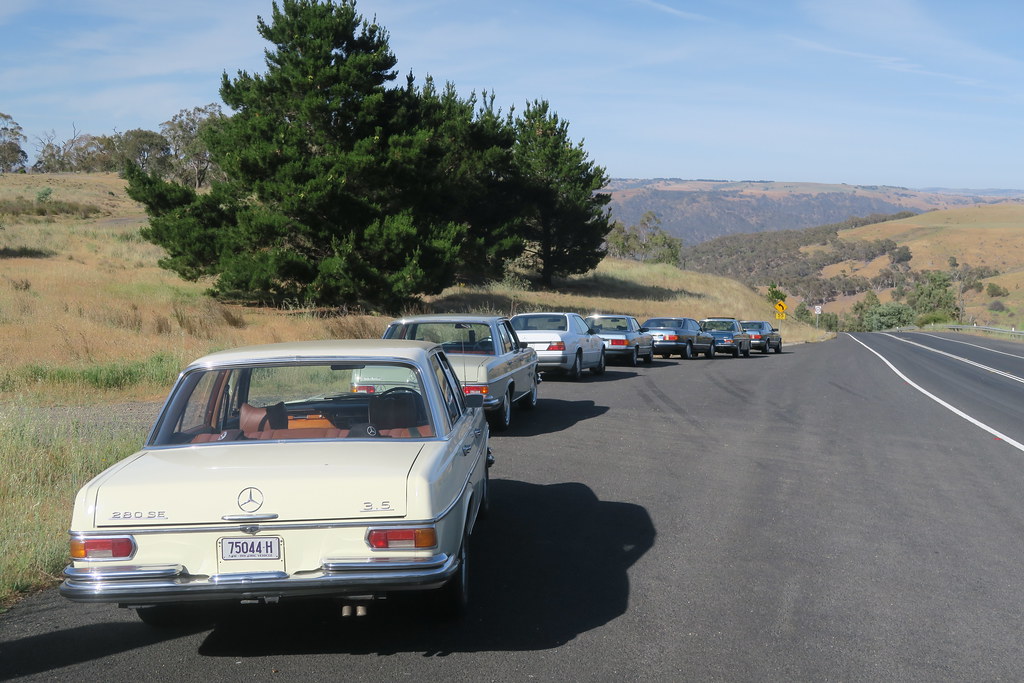
We stopped for Petrol at the Big Merino, were the two W124 Wagons joined us, namely an E220 and a 300TE. At our fuel up, it was interesting to note how good on fuel the two 280SE 3.5s are. This is especially impressive, given the W108 has all the aerodynamics of a brick. The W108s did better than both W126s for eample. 
From there we took the back roads towards Fyshwick to our lunch stop at MB Spares & Service. It was great to catch up at MB Spares and see some of the projects they have going. Of particular interest was some very interesting factory literature, some very rare cars in the workshop, the rebuild of a factory 617 turbo diesel and see a wrecked 560SEL that was an amazing demonstration of the rigidity of the W126 passenger safety cell. It was very good of John, the owner of MB Spares, to host us for lunch. 
After lunch, the next stop for our convoy was Cooma. The scenery gets progressively better along this route, but it probably the least interesting that we did today. What was apparent was how well all the cars were responding to a good run. After we had a short break at Cooma, the final leg of the day was to Tumut via the Alpine Way. However, before we left Cooma, we called in breifly at Flynn’s wrecking yard, which is the biggest in the Southern Hemisphere, and can be seen from space. Given there was a $10 entry fee, and it wasn’t clear how many Mercedes-Benz they had, we didn’t go into the actual yard and kept going. 
The Alpine way was the only part of todays drive I had not done before and I really enjoyed it. It was a really fun road through some amazing scenery. One of our group suggested a stop off at Yarrangobily Caves Thermal Pool. This didn’t turn out to be quite as good as we had hoped. The road to the pool was one way, and quickly became unsealed. The owners of the W108s were not enthusiastic about taking their cars down that road. We did get there in the end, and take a few photos of the cars, but there wasn’t really time to do much more, as we wanted to get to Tumut before it started getting dark. Driving on the back roads in Australia at dawn and dusk means a high chance of encounters with the local wildlife, especially Kangaroos. I know this all too well. 
Our group rolled into Tumut about 7;30PM. According to my odometer, we covered 634km today. Given the core route was 585, this made sense for the various small detours we did. We checked into our hotel in Tumut and went to a local pub for dinner. Our first day was really good, especially how we all arrived without incident. I’ve been very happy with how the 560SEC has performed on this trip. Its been fast, powerful and comfortable, and the A/C has kept me cool. Last year, I went on a 4,000km road trip with some friends from the Mercedes-Benz club to the National Rally in Adelaide. We all took classics, and we took the scenic route there and back. In may ways, the trip there and back was better than the event. For 2023, while there was no National Rally, we were keen to do another. We picked the Mercedes-Benz Club of Victoria’s annual concours event. I’ve wanted to go to this for years, as I had heard the standard of the cars at this show is very good. In addition, at a S124 tech day earlier this year, another group was thinking of going down to Melbourne to do another tech day. We decided to join the two groups and attend both events. To make it manageable, we put a cap of 10 on our group, and started planning. The distance to Melbourne is shorter than Adelaide, so it will mean that we need to do less driving per day. I’m taking my 1987 560SEC. I’ve been doing work to get it ready for the drive including having the transmission rebuilt, replacing the drag link and upgrading the front and rear speakers. This time I will not be the oldest car on the trip. There are four W108’s coming along – three 280SE 3.5s and a 280S manual. I had considered bringing my 250SE, but it still has a few things that require sorting out before I would take it on such a long trip. 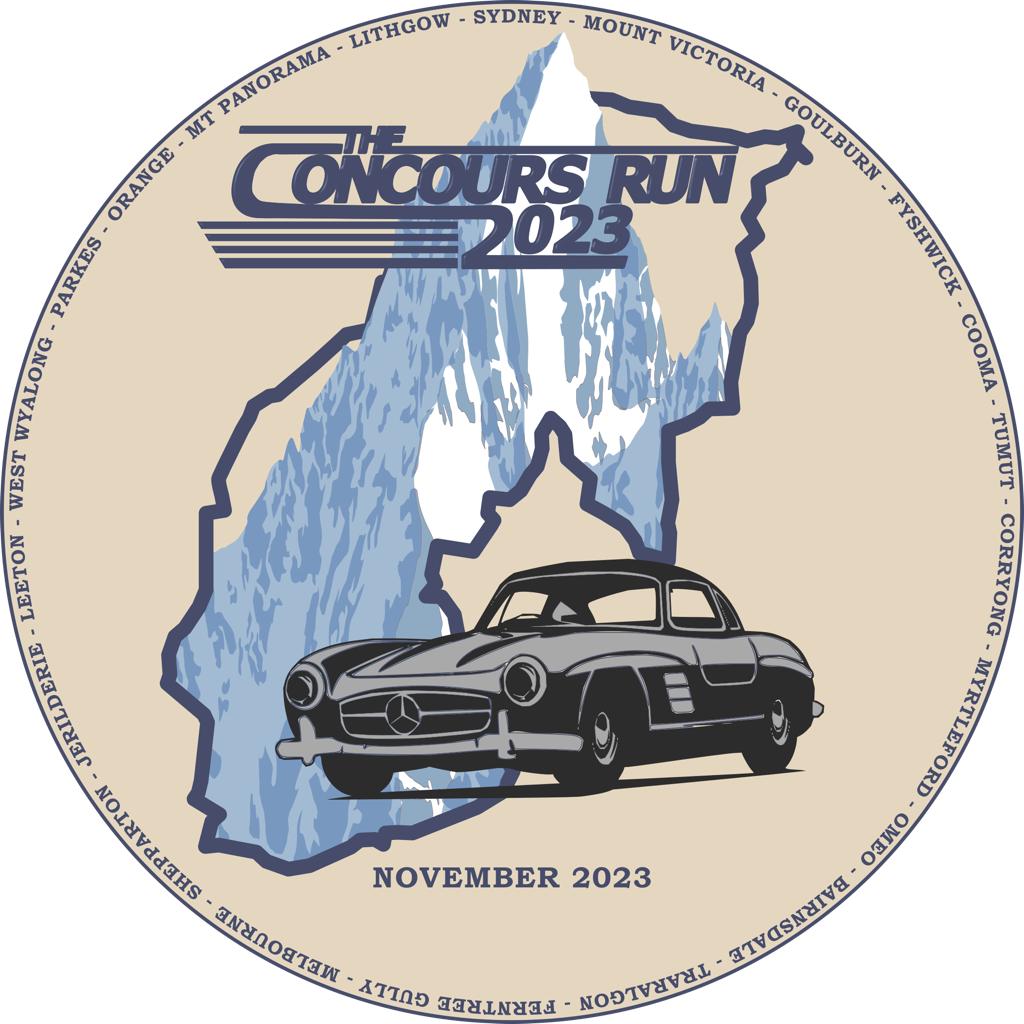
As with last year, we have a trip logo and will have magnets for the side of our cars. One of our group made this really cool image of our route for the logo. Also based on our experience last year, we will have more powerful walkie talkies. We purchased the Quansheng UV K5 from Ali Express for our group. We’re going to have a great convoy of cars for our group. We’ll have the four W108s already listed above, plus two C126s, a C107, a C124 and then either one or two S124s. Our route was selected to avoid motorways wherever possible. Motorway travel is very boring and the whole point of this trip is to enjoy some good roads and see the country in classic cars. 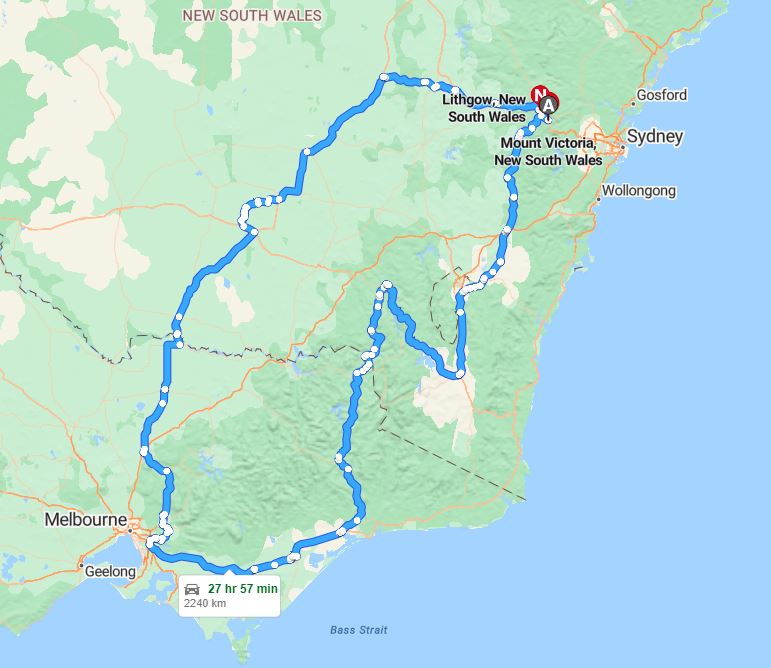
Day 0 – Sydney to Mt VictoriaOur official route starts at 6:30AM the next morning at Mt Victoria. Since most of our group live a fair distance from Mt Victoria, most of us will stay at a pub overnight. We will each make our own way up to the pub. Day 1 – Mt Victoria to TumutOur morning will take the excellent road between Oberon and Goulburn. I’ve done this road a couple of times now and its one of the best driving roads in NSW. There is very little traffic and its a great mix of twisty sections, sweeping bends and straights. After a short break in Goulburn, we’ll head to Fyshwick via Tarago and a stop at MB Spares and lunch nearby. After lunch we’ll drive south to Cooma, before heading up towards Tumut via the Alpine way. Tumut will be our stop for the night. Total driving for Day 1 will be 585km. Day 2 – Tumut to TraralgonDay two will take us through the high country roads from Tumut to Bairnsdale. For much of the day we are on the scenic B500 Great Alpine road. This is supposed to be a great driving road with some nice places to stop along the way. Our final leg will take is into Traralgon, our stop for the night. We will have covered 524km. Day 3 – MBCV Tech DayThe main purpose of Day 3 is the tech day with MBCV members. We’ll drive into Melbourne from Traralgon, and head to the MBCV club rooms at Ferntree Gully. The focus of the day is electrical troubleshooting. We’ll start with a theoretical section on using a multimeter for voltage, amperage and resistance settings. After that, our host will have prepared a couple of cars with specific faults for us to use our new skills to troubleshoot. There should be most of our group and 10-15 MBCV members. Dinner is being hosted by MBCV. We’ll have a private room in a local club. Day 4 – MBCV Concours and drive to LeetonThe MBCV concours will be held at Wandin East reserve. We’ll spend the morning at the concours, and the MBCV have prepared a section for our cars to park. Early in the afternoon, we’ll head off and start our journey home. We’ll take Black Spur drive out of Melbourne, which is apparently one of the best driving roads in the area. We’ll head north to Leeton via Shepparton and Jerilderie. Our stop for the night is the historic Hydro Hotel in Leeton. Day 4 takes us 447km. Day 5 – Leeton to Lithgow and home.Our final day takes us inland towards home. We’ll head to Parkes via West Wyalong. It should be possible to get a few photos of the cars with the dish behind them. From there, we’ll head to Mt Panorama via Orange. We’ll be able to do a slow speed lap around the track at Mt Panorama. This is a normal road when there is no racing, although speed limits are very low and very aggressively enforced. We’ll head to Lithgow before the convoy breaks up and we go our separate ways. Day 5 takes us 633km. Last night I finished the installation of the refurbished W124 instrument cluster. I’m really happy with it, and its really lifted the car. I ended up installing it as part of my failed attempt to change the centre vent. Even after changing the bulb, the vent illumination was not working. I realized that it must require the instrument cluster to be plugged in. This proved to be the case, and also fixed the illumination for the outside temperature gauge. Before I re-installed the cluster, I added more ATF to the speedometer cable. This is an attempt to lubricate it and stop the speedometer needle bouncing around at low speed. I then plugged in all the electrical connections. Most of them had plenty of slack, so this part of the job was quite easy. Re-attaching the speedometer cable is more fiddly as there is minimal slack. I didn’t push the cluster all the way in and did a test drive around the industrial complex. It was soon apparent that the bulb that illuminates the left hand side had blown. I had one left in my box of bulbs, so I quickly swapped it over. If you own these cars, its really handy to keep spares like this on hand. On the less positive side, I can’t say that the ATF has really helped my speedometer needle a great deal. It is improved, but not by very much. It was worth a try. 
Given that you are sitting in front of the instrument cluster the whole time you are driving the car, I think is a very worthwhile improvement. I find these sort of projects really make a big difference. My refurbished W124 instrument cluster wasn’t all that expensive and only a few hours work. It is especially apparent when compared to how it was. 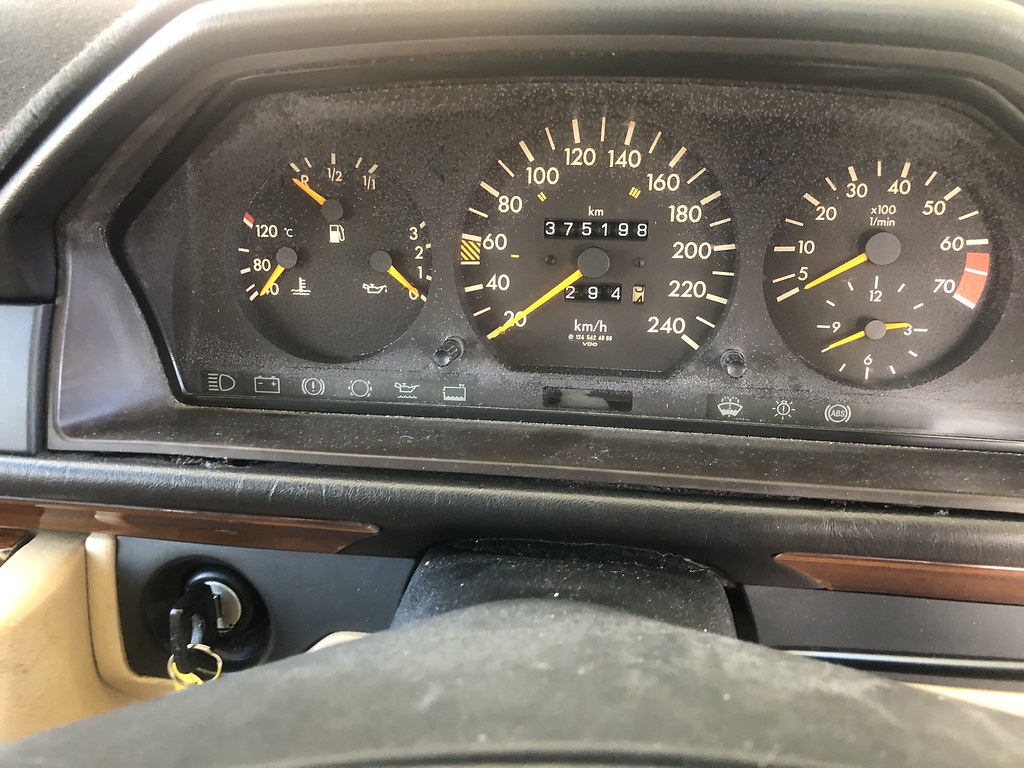
One of the items on my todo list for the 300TE was to replace the W124 centre vent. A couple of the slats were broken, so I could not direct the air, and the open/close control was not working either. The open/close control is especially important in winter, as heat doesn’t come out of the centre. I was told that the RHD part is different to the LHD part, so when I saw a reasonable deal on the RHD part, I purchased it. The part number (at least for my car) for the W124 centre vent is A124 830 08 54. From looking at the new part, it had screw holes on both sides, so I assumed that it would require the instrument cluster to be removed. Turns out that the right screw hole is not used, so the vent can be removed without removing the instrument cluster. On seeing that, I looked in the EPC, and actually I don’t think the RHD and LHD parts are different. And I think that extra hole proves it. 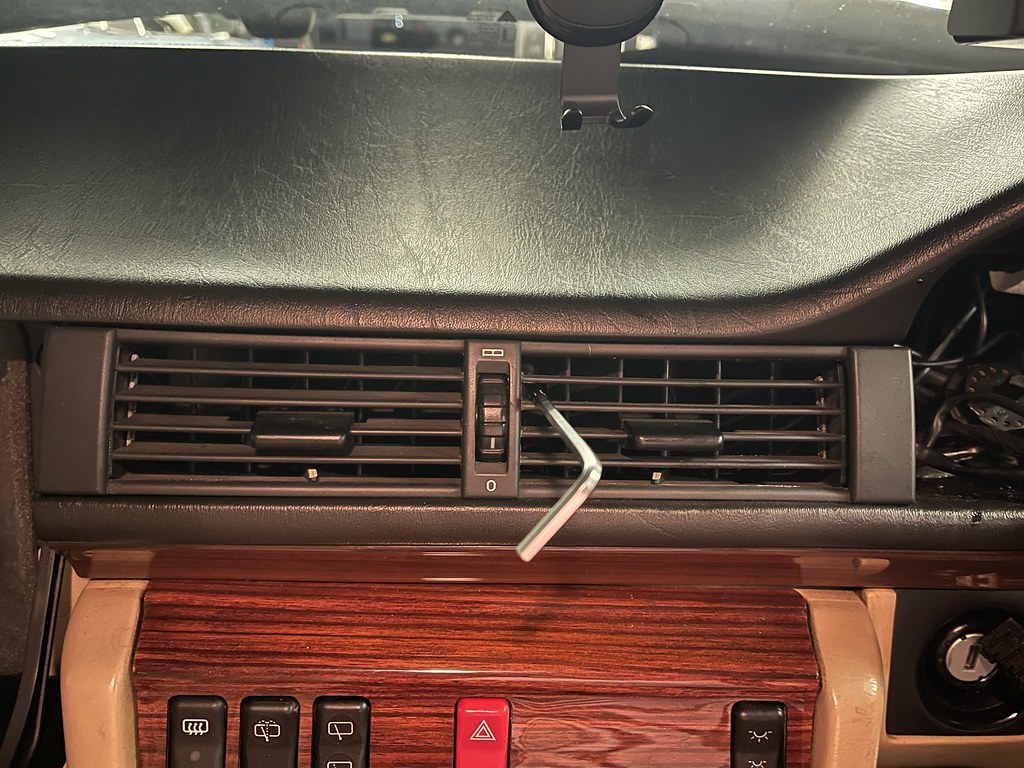
There are four things holding the vent in. A screw on the left hand side which is accessible with the glove box door open. Then there is a small bolt holding the vent onto the flap behind it. This is removed with an Allen key, 4mm if I recall. It is accessed from the right hand side of the vent, near the centre (pictured above). Finally there are two clips also on the right hand side of the vent. One of mine was broken, but the other I could get up with a long thin screwdriver. It helps to have the new part on hand to see where they are. Finally, there is a small bulb that fits into a slot in the back at the bottom centre. This was blown on my car. 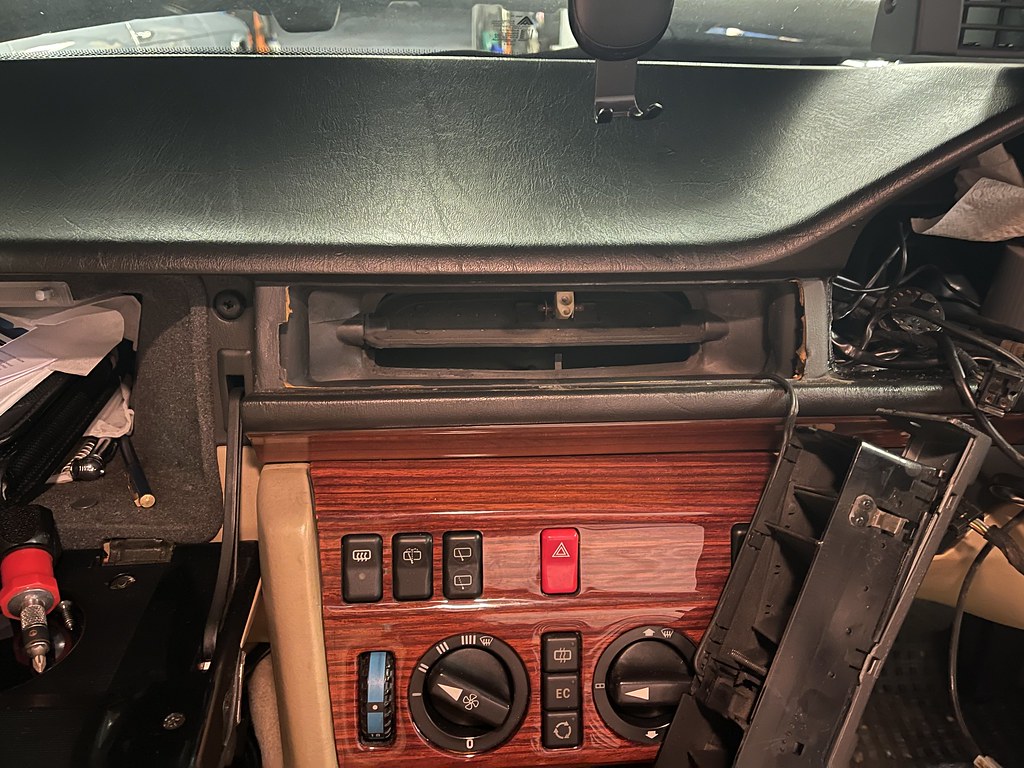
I was able to get the old vent out pretty easily. And generally putting the new vent in is the opposite of removal. There were two slightly tricky aspects. The first involved changing the bulb. I bought a bag of these dash bulbs about 10 years ago when I had my black 560SEC. I used the final one one for this repair. Firstly, I couldn’t get the bulb to work at all. Then I noticed that none of the dash lights were working. I realized that the instrument cluster must be installed and plugged for the dash lights to work. This also explained why the light for the outside temperature gauge wasn’t working. I re-installed the instrument cluster, and then found that while the bulb wouldn’t work when fully inserted, being out about 1mm had it illuminated. 
It took a few goes to get the bulb holder into its socket, and the wire fed into the wire holder at the bottom of the vent. On the first few tries, the bulb pushed all the way in and stopped working. Eventually I had it in and was greeted with a properly illuminated dash. The next part was to push the vent in. That was trivial. Lining up the allen bolt with the plastic connection for the flap was harder, but I found it easiest with the flap and vent wheel in the closed position. It was all going well, until I tightened that bolt too far and snapped something. I’m pretty sure its the plastic piece that goes onto the flap. This is really frustrating as fixing this was the primary reason I was installing the new vent. I can’t see that plastic bit as a separate part, so I suspect I will need to get a flap from a wrecked car that has a good plastic part and transfer it. I’m really annoyed with myself, I was being careless screwing in that bolt. I still have a slight improvement, as the bulb works, and I can at least direct the air left and right. But the main reason why I spent about $250 and an hour of my time is a big fail. In a previous article I had been undertaking a 300TE speaker upgrade. I started with the rears which were very simple. Next was the fronts. As I outlined in the first part, the W124 uses an odd size and mounting system for the front speakers. They are 12cm and use these clips on the side rather than the normal mounting ears. I guess this system was used in a few European cars of the era, as there are still a couple of manufacturers who offer speakers like these. 
I went with the Crunch DSX120, in a kit for the S124 that included adaptors for the Becker plugs. The picture above shows the underside of the speaker and the mounting clips. For some reason the speaker connections are hiding under the magnet and I had to bend them back to put the supplied adaptors on. The supplied adaptors were pretty poor quality. The positive terminal fit ok, but the negative terminal was too large and needed adjustment with pliers to make them work. However, to mount the new speakers, first had to remove the old. The grilles are easy to remove once you know how. The thin strip to the side of the grille just clips into place. It can be removed with a trim removal tool or even a flathead screwdriver. Once removed, there are two screws that hold down the inside of the grille, with the outside held down by two plastic tabs and the A pillar trim. 
Once I had the trim off, I was confronted with some small speakers that had been poorly mounted in the holes. At least they had not cut the hole any larger. No wonder they rattled and sounded terrible. 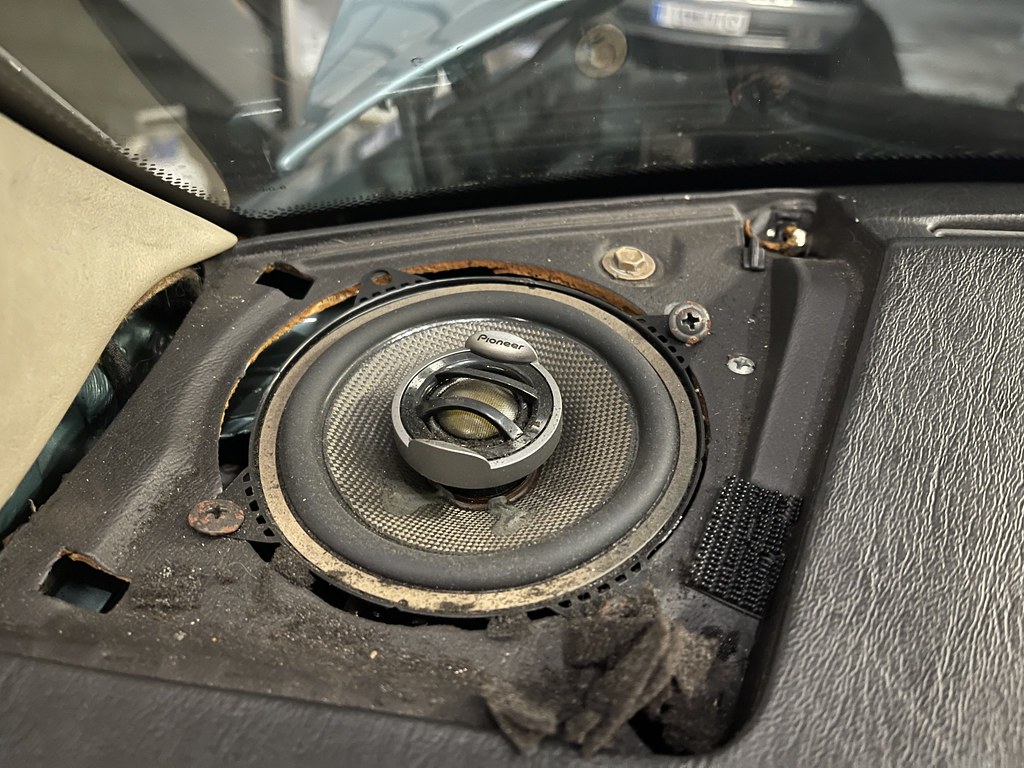 The previous installer had soldered them to the Becker wires, which seemed a lot of work when fitting the wrong sized speakers. As nothing was cut, it was a simple matter of just clipping the new speakers into the factory speaker holes. They fit perfectly. The previous installer had soldered them to the Becker wires, which seemed a lot of work when fitting the wrong sized speakers. As nothing was cut, it was a simple matter of just clipping the new speakers into the factory speaker holes. They fit perfectly.
 I tested the speakers before I refitted the grilles. They sounded a lot better. No more rattling and buzzing from the passengers side. The extra size also added more depth. I tested the speakers before I refitted the grilles. They sounded a lot better. No more rattling and buzzing from the passengers side. The extra size also added more depth.
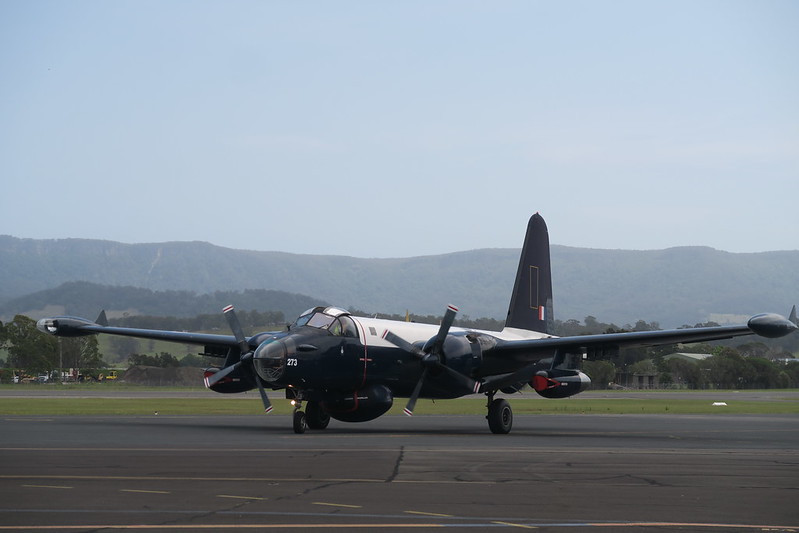
Once tested, I put the grilles back on and my 300TE speaker upgrade was complete. I am pretty happy with how it sounds with the original Becker. Unlike in the 560SEC I am not running a modern amplifier. Given the size of the rear speakers, I don’t think its necessary. This has been a quick and simple upgrade that sounds a lot better. And now with the factory grilles installed, it is invisible. Doing the front speaker upgrade was also the impetus for me to refurbish my instrument cluster, as I could push it out from the speaker hole. Today was the third annual Youngtimer Sacco day. This is an event run by the Mercedes-Benz club to celebrate the cars of the legendary designer, Bruno Sacco. As with the last two, the event was held at HARS. HARS is an aviation museum located at Shellharbour Airport in Albion Park NSW. 
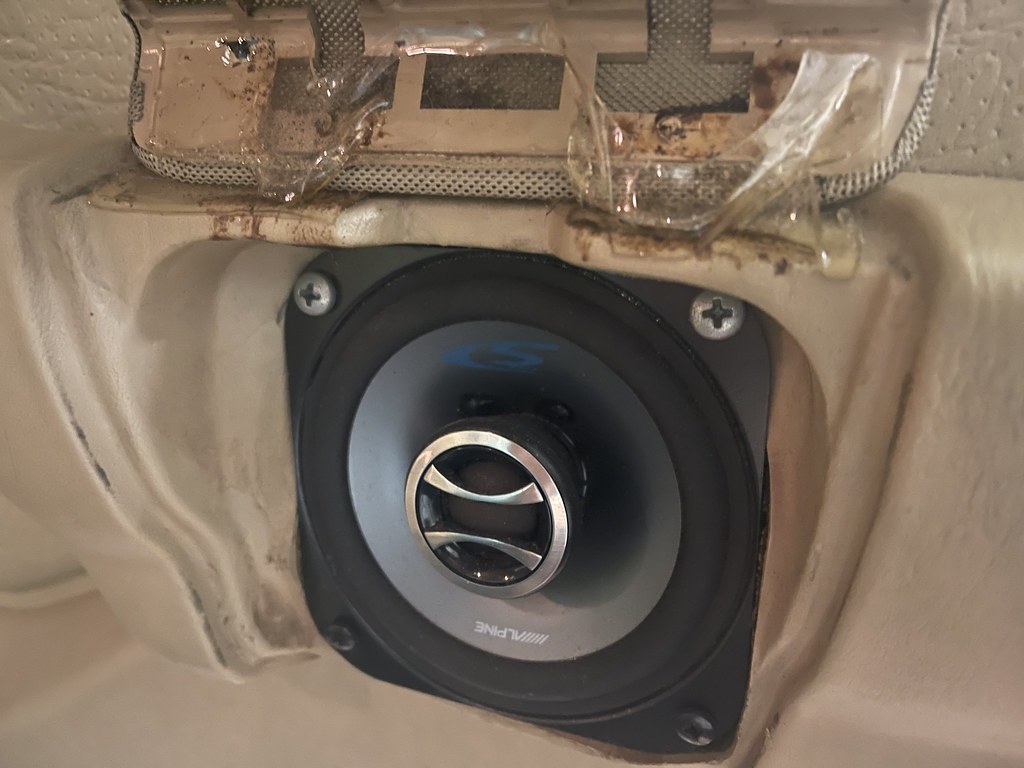
The event is focused on the cars designed by Bruno Sacco, but other cars could attend. Sacco was lead designer for Mercedes-Benz from 1975 to 1999. His era covers a number of key models in Mercedes-Benz history such as the W126, W201, W124, R129, R230 and more. Sacco also contributed to the W123, although mostly under the direction of Fredrich Geiger. I had planned to take my 1987 560SEL. I own three Sacco cars, the 560SEL, my 1987 560SEC and my 1990 300TE. The 300TE was ruled out as the instrument cluster is still out, as is the centre AC vent. I’m taking the SEC down to Melbourne later in the week, so I thought I would take the SEL. However, after driving out of a multi-storey parking lot on Friday night, the drivers window failed to go back up. I assume the plastic slide in the window regulator is broken or jammed. That ruled it out and I took the SEC instead. The SEC went well, and the wheel alignment and balance seems to have fixed my wheel wobble issue, although I still have some vibration at low speed turning. 
As with the 2020 event, we started at Tynan’s Mercedes-Benz dealership. We then took the Grand Pacific drive though the Royal National Park before ending up at HARS. Unlike the last two events, we could not drive the cars onto the apron. Some idiot drove a BMW M-car at high speed on an active runway, causing cars to be banned. I hate these knee-jerk rules, they should have just thrown the book at the offender. The drive through the national park was good as always, and the cyclist menace was not as bad as normal. HARS is well worth a visit – they had multiple aircraft flying, and we could take a tour of the Super Constellation and the Boeing 747. I took my three kids and they all enjoyed HARS. After a couple of hours at HARS, we took a very enjoyable drive over Macquarie Pass to Moss Vale for lunch. This was the same place we had lunch in 2020. I understand there were more than 30 cars on the day. This time the W124 was the clear majority. In the first year, the W126 was king of the hill, especially the 420SEL. There were probably as many 420SELs as there were cars today. Although I am a big fan of the designs of Bruno Sacco, my favourite car on the day was the W111 280SE 3.5 cabriolet, a design of Paul Bracq. The day was really good, and an improvement over 2021. In 2021 the weather was rather poor, and we didn’t do the second drive for lunch. I’m glad that was brought back. We didn’t top 2020 as that event was huge and we had access to the apron to show off the cars. I think that was what was missing this time – we didn’t have the showcase of all the Sacco designs lined up. I certainly enjoyed the day and Youngtimer Sacco day remains one of the premier events on the MBCNSW calendar. I wasn’t very happy with the sound from my 300TE. The front passengers speaker rattled badly and the sound wasn’t the best. As I’m taking the car on a road trip in January, I wanted better sound. I’ve already put the Becker 1402 back in, so all I needed was some decent speakers. In researching what was possible, options were not extensive for the S124. The front speakers are both an unusual size (12cm) and an unusual mounting system. The rears are are a more common 10cm size, but mounted in the door handles. I personally don’t think much of the speaker setup in the car. There is room for some larger speakers in the front, and the door handle speakers are just silly. It would have been possible to come up with a much better way to mount door speakers in a much larger size. Certainly in 1990, the W126 in some markets (Not Australia) already had much better door mounted speakers. 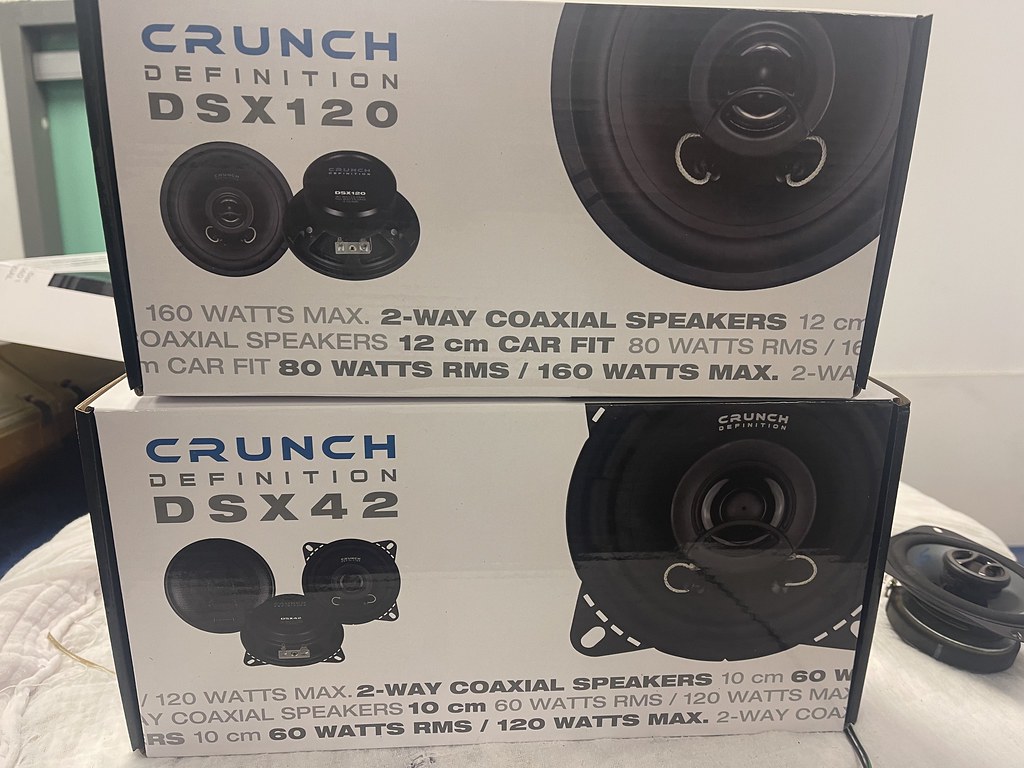
Given these idiosyncrasies, I there were not a lot of options for the car. I found a German car audio store that was selling a kit for the S124 that included the four speakers and adaptors for the Becker plugs. I bought this, and also the correct speakers for my 560SEC to combine shipping. These were the Crunch speakers pictured above. I started from the rear. The rear speaker grilles are very fragile, and its likely ham fisted speaker installers have damaged them over the years. There is a screw on the underside, and then the grille lifts up. Unfortunately some owners have put screws in the top which is highly unsightly.  My car wasn’t that bad, but the clips on the top of the drivers side rear were broken off, so some kind of glue was holding them in. Removal of the cover revealed a decent looking Alpine speaker. I prefer to have all four speakers in a car the same make and model family, so I still changed them. My car wasn’t that bad, but the clips on the top of the drivers side rear were broken off, so some kind of glue was holding them in. Removal of the cover revealed a decent looking Alpine speaker. I prefer to have all four speakers in a car the same make and model family, so I still changed them.
The new Crunch speakers went in quite easily. I didn’t need to use the adaptors, as the Alpines had normal speaker plugs. It was fairly trivial to plug them in and put the grilles back on. The first part of my 300TE speaker upgrade only took about 30 minutes to do. I thought I had photographed the new speakers in place, but looks like I didn’t. At this stage, its hard to determine the impact as the rears are less important than the fronts. I had previously replaced the front speakers in my 1987 560SEC. Now it was time to look at the rears. As I outlined in the article about the front speakers, I am replacing the W126 rear speakers with Crunch 16.5cm speakers. These speakers should fit into the factory brackets and underneath the factory grilles. Changing the rears in the second generation W126 is a bit more of a fiddly job. For starters the factory grilles are now very brittle. Not only are they over 35 years old, but the Australian sun is not kind to plastics. It is quite common for them to break when removed. The best way to ensure this does not happen is to remove the seats first. The grilles have to slide towards the front of the car, and the top of the rear seat is in the way of that. Despite having owned three 560SEC’s in my life, I had never removed the rear seat. I assumed it was like the C107 or W111 coupe, where getting the rear seat out is like wrestling with a gorilla. However, that is not the case in the SEC. The left and right sections are removed separately, making it quite easy to get them out. As with the saloon, the bottom cushion is removed by pressing the red tabs, and then the backrest lifts off ‘hooks’. It took me a matter of minutes to get the seats out. While they were out, it was a good opportunity to clean them and apply leather conditioner. While I regularly clean and condition the seats in the car, it was amazing how much better a job I could do having them out. It was almost worth doing this job just to force me to remove the seats and clean them. 
Once the seats were out, the speaker grilles could be removed. They slide towards the front of the car. It is vital to be very gentle with them. There are various hooks that are easily broken off. The hardest one to get out is actually the front one. Normally what happens is that it also pulls out its receptacle from the parcel shelf. Once I got the grilles out, I was shocked to find that the car still had the original factory speakers. Still with the original MB part number on them, made in West Germany. They sounded better than the more modern Pioneers I removed from the front. It seems incredible that somebody would go to the trouble of rewiring the car for the speakers, fit new front speakers, fit a new head unit and leave the old rear speakers alone. As the car had been rewired to remove the fader, the becker plus were no longer there.  The series 1 W126 had the same size speakers front and rear. To fit larger speakers in the series 2 cars, the factory came up with these angled brackets to fit a 16.5cm speaker. The brackets are held in with two screws towards the front of the car. Once those are out, the unit pulls towards the front of the car and can be lifted out. The series 1 W126 had the same size speakers front and rear. To fit larger speakers in the series 2 cars, the factory came up with these angled brackets to fit a 16.5cm speaker. The brackets are held in with two screws towards the front of the car. Once those are out, the unit pulls towards the front of the car and can be lifted out.
The factory speakers are glued to that bracket. Given their age, its fairly easy to pry them off the brackets with a screwdriver. Instead of gluing my new W126 rear speakers on, I used double sided tape. 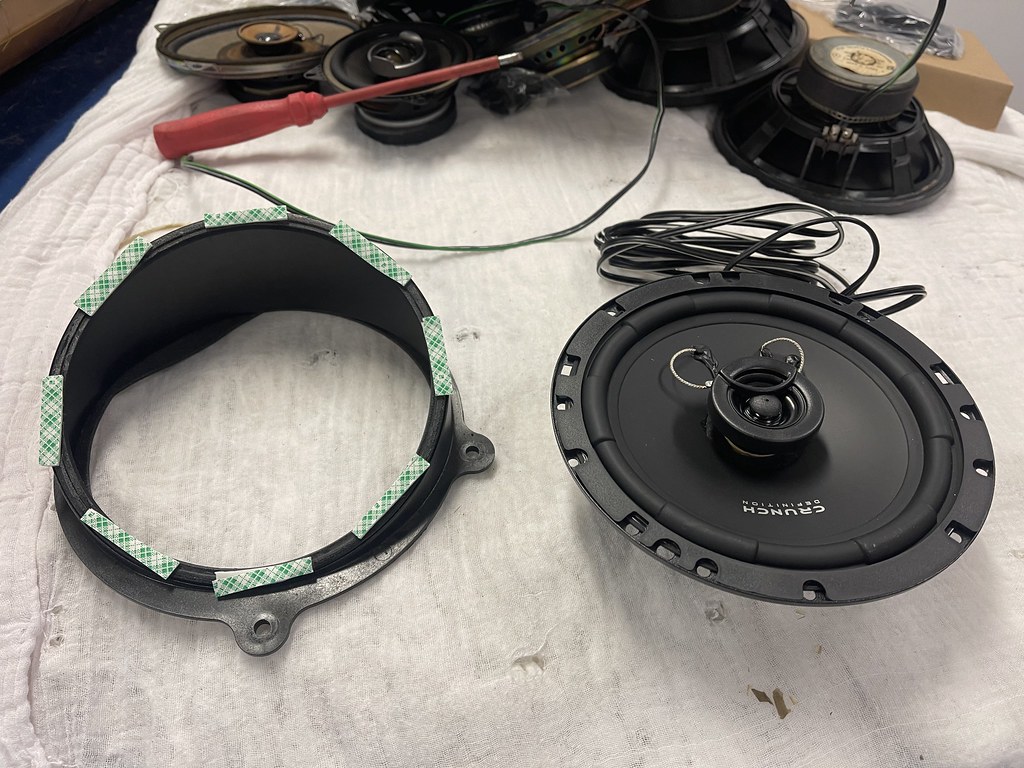
The Crunch speakers fit perfectly in the brackets. The speaker is actually deeper than the bracket, but that is ok, as there is a hole in the rear parcel shelf for them to protrude through.  Once mounted, the Crunch speakers are slightly taller than the old factory ones were. They still fit into the hole in the parcel shelf and the factory cover still fits on there quite well. Once mounted, the Crunch speakers are slightly taller than the old factory ones were. They still fit into the hole in the parcel shelf and the factory cover still fits on there quite well.
 In the picture above, you’ll see the square hole in the parcel sheft to the front of the speaker. A receptacle for one of the hooks in the speaker grille goes in there. In both cases for me, the receptacle came off with the grille. It is much easier to fit the grille if you remove the receptacle from the grille and put it back where it goes. I found this out when doing the second speaker. In the picture above, you’ll see the square hole in the parcel sheft to the front of the speaker. A receptacle for one of the hooks in the speaker grille goes in there. In both cases for me, the receptacle came off with the grille. It is much easier to fit the grille if you remove the receptacle from the grille and put it back where it goes. I found this out when doing the second speaker.
But before I put the grilles on I tested the quality of the sound, and I was happy with it. Its not perfect, but its a huge improvement on what I had before. I feel like I have a system that looks like a factory setup, but sounds better. I also have much nicer and cleaner rear seats. I’ll have a long road trip to decide how good this system really is. In testing the setup, It also sounds heaps better if the EQ function on the iPhone is disabled. 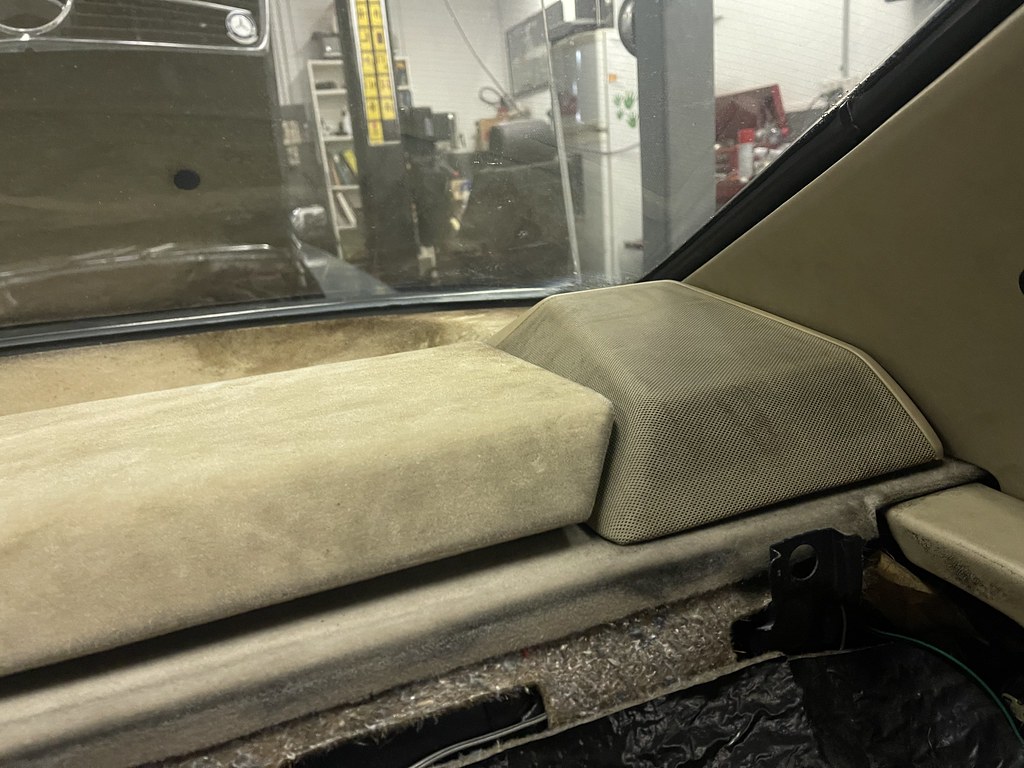
I’m planning to drive my 560SEC down to Melbourne in a few weeks. I’m going see the Mercedes Benz Club of Victoria concours and attend a tech day on electrical troubleshooting. A drive like this meant attending to a few things I had on my to do list for the car. One of them was to replace the W126 drag link. It was supposed to be replaced at the same time as the tie rods and idler bushing were done. Unfortunately, I had bought the wrong part. I should have realized but the left hand drive part is different to the right hand drive part. The part number for the RHD drag link is 126 460 09 05. The other thing I wanted to do was check the balance of my front wheels, as I had a wobble on the way down to Canberra for the ACT concours. I figured it made sense to do the drag link first, then send the car in for an alignment and to check the wheel balance. The drag link is quite an easy job to do with a hoist and the tool to pop off the ball joints.  As it turns out, this would be the last job I would do on the hoist for now. Once I finished it, I started putting the 300TE and noticed a growing puddle of hydraulic fluid on the ground. I quickly got the car down. I’ll need to get the hoist serviced. As it turns out, this would be the last job I would do on the hoist for now. Once I finished it, I started putting the 300TE and noticed a growing puddle of hydraulic fluid on the ground. I quickly got the car down. I’ll need to get the hoist serviced.
With the new W126 drag link in, the groaning/vibration I was getting from the steering at low speed was almost completely gone. The old drag link looked like it had been on for a long time. Certainly the tie rods were probably from the car’s time in the UK, as the bolts were rusty. I took the car to the alignment shop. They found it was quite badly out of alignment, and that the front wheels didn’t have enough weight on them. I haven’t been onto a motorway since, but a short burst of speed made the car feel a lot better.  The other thing I di while I was working on the car was fit a BM2 Battery Monitor. I’ve got these on a few other cars. It allows me to monitor the health of the battery from bluetooth. The other thing I di while I was working on the car was fit a BM2 Battery Monitor. I’ve got these on a few other cars. It allows me to monitor the health of the battery from bluetooth.
I’m taking my 560SEC on a long road trip in a couple of weeks. I’ve never really been especially happy with the sound from the speakers, particularly from midrange tones. Before I took the car on a long trip, I wanted to upgrade the speakers. 
I am also doing a similar project on my 300TE. On that car, one of the front speakers is damaged and makes a rattling sound. The W124 speakers are harder to find than for the W126. The front speakers on a W124 use an odd mounting system, and the rears have minimal clearance. There was an audio store in Germany that sold a kit for the S124, and also carried speakers that should fit into the second generation W126. It made sense to buy them all at once, as shipping from Germany is very expensive these days. Based on that, I ordered four sets. I prefer to keep all four speakers from the same manufacturer (and ideally the same range) in a car. The speakers for the W126 were 10x15cm for the front and 16.5cm at the rear. The factory front speaker in the W126 is actually a small round speaker in an oval housing. These can be replaced by oval speakers. They also came with adaptors for the Becker plug system. 
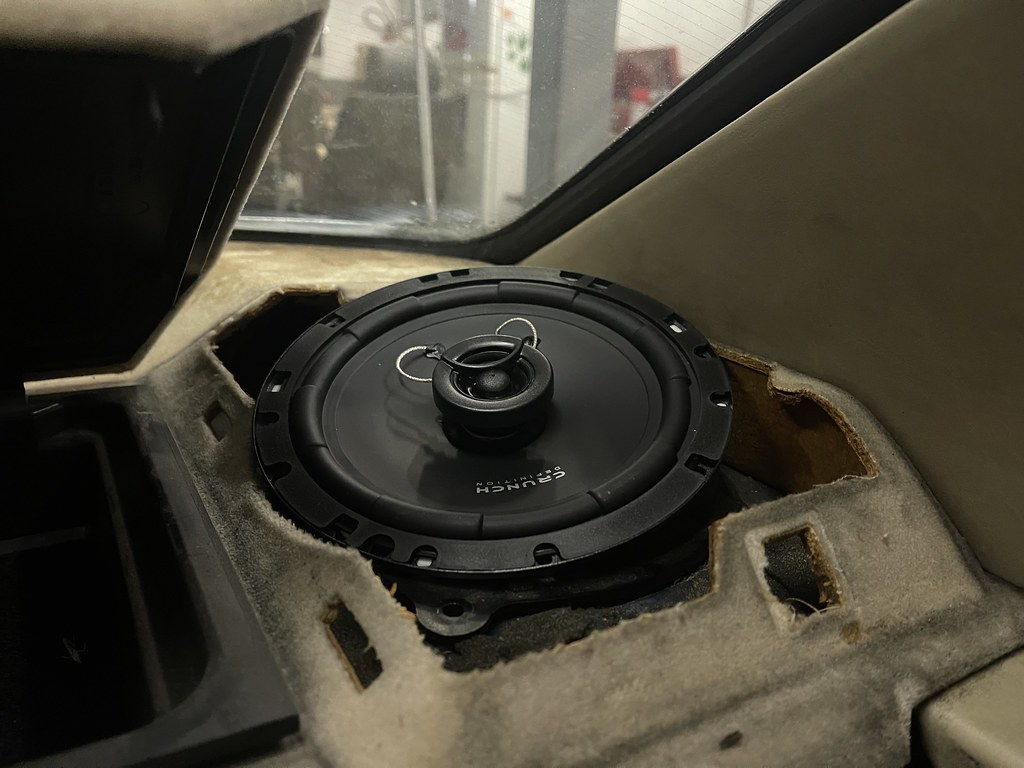
When I removed the grilles in the 560SEC, I found a set of old Pioneer 4×6″ speakers in there. They looked like they were about 20 years old or so. The Becker plugs were long gone, so it was quite easy to use the standard speaker plugs for the new crunch speakers. On comparing them, the Crunch speakers had a far larger magnet, and it was quite a tight fit to get that magnet through the speaker opening. The speakers don’t sit quite flush due to the large magnet size, but there is just enough room to install the speaker and cover it with the factory grille. 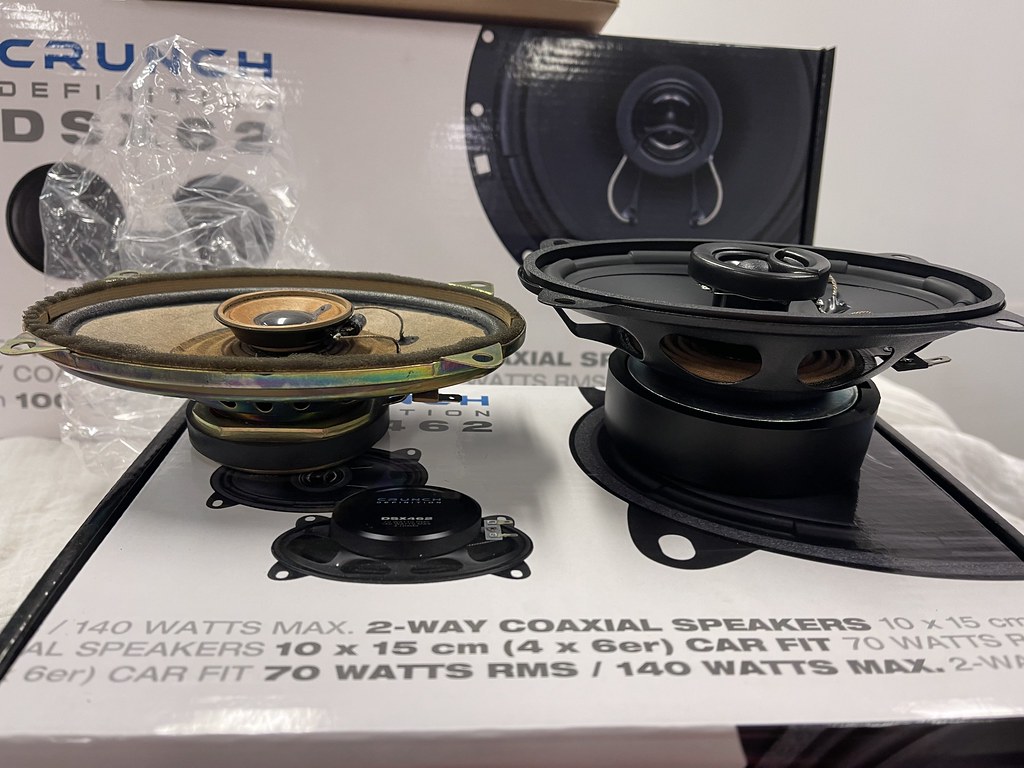
The new speakers sound a lot better. It’s never going to be perfect as I’m playing music through an FM transmitter, but they do make a big difference. On the 560SEC, I am using a Becker 1402, coupled with the factory line out module to use an external amplifier. Next step is the rears, which are far more fiddly to install on the W126. 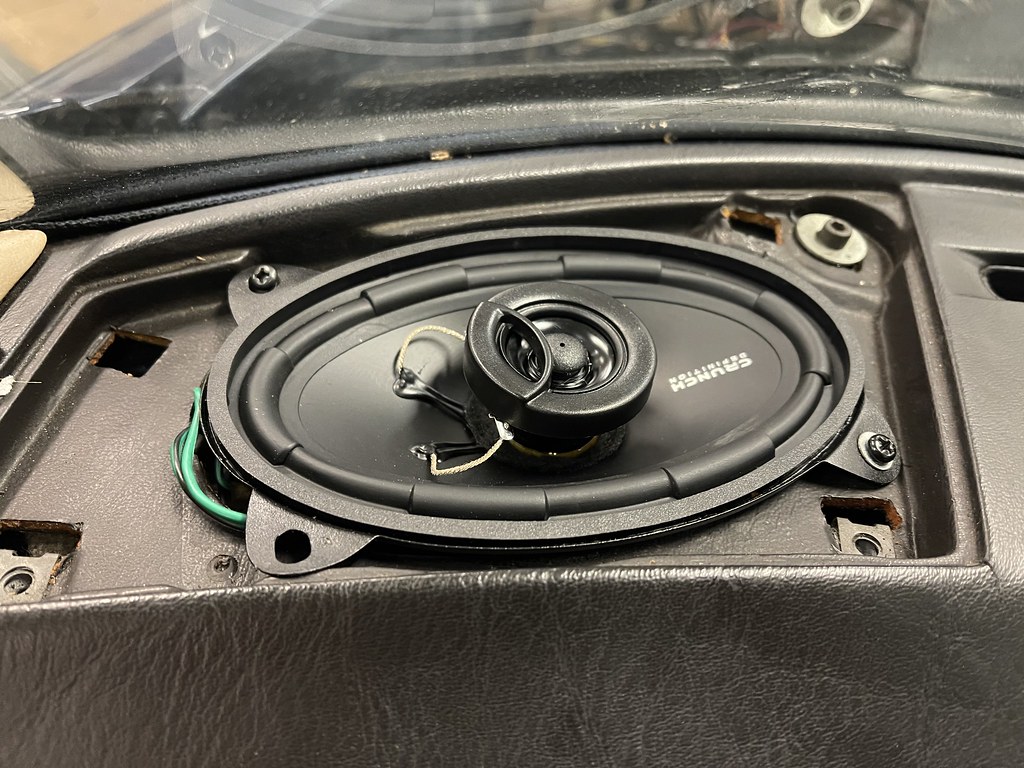
| |